Audience Targeting in SharePoint Online
Audience targeting in SharePoint Online helps relevant content get to the right audience. It allows you to personalise the experience for your users and feed them certain content depending on which security groups they belong to.

It is not a replacement for permissions and properly designed security on your SharePoint environment, however it is a great tool to avoid unnecessary clutter on your pages and be more efficient in your communications and interactions.
Where you can enable Audience Targeting
Navigation links – You can customise your navigation links in SharePoint to promote or hide them for specific audiences. This includes hub and footer navigation.

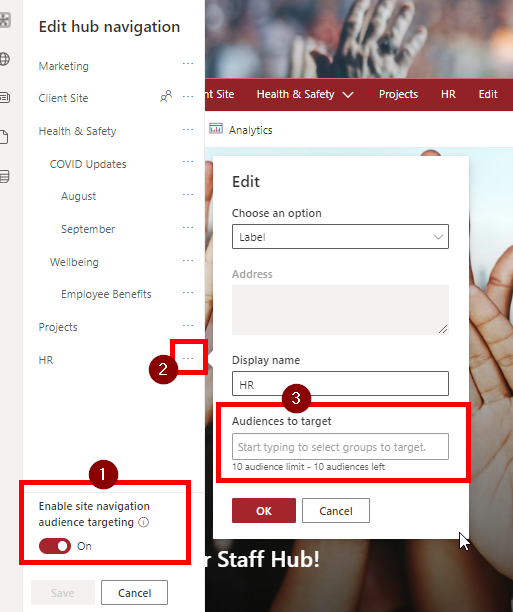
1. In your Hub Site, click “Edit” on the hub navigation
2. At the bottom of the navigation panels, toggle the “Enable Audience Targeting” to “On”
3. On any of your navigation links, click the 3 dots and click edit
4. You will now see an “Audience Targeting” box, where you can enter the security groups of the users that will see the navigation link
5. You will now see a user icon next to any of the links where you have set audience targeting
6. Click Save!
News web part – Users will only see news posts targeted to them if you enable audience targeting on the News Web Part.
1. This needs to be configured in the Site Pages library first as that is where news posts are stored – Go to your Site Pages Library and click Library settings, then Audience

2. Click the check box to enable audience targeting

3. Next, navigate to your page where the news web part resides and go into edit mode
4. Click the edit/pencil icon on your news webpart
5. In the edit menu, toggle “Audience Targeting” to “On”

6. Hit apply and then re-publish your page
7. Now, you can go to any of your news posts, go into edit mode, click on “Page Details” and enter the groups you would like to target the news post to
8. Click publish and now only the specified audiences will be able to see that post on your news web part!
Highlighted content web part – Although a user may have permission to all items in a list or library, setting audience targeting on a HCWP allows you to dynamically display relevant content. A use case for this may be a document library that contains company policies. Some apply to Sales employees and some apply to Finance. If a member of the Finance team is logged in, you may just want them to see Finance related policies and if a member of Sales is logged in, you want them to only see Sales Policies.
1. Navigate to the document library where the documents reside and go to document library settings
2. Click on “Audience Targeting settings” and click the checkbox to enable Audience Targeting
3. You will now see a new column in your document library called “Audience”. This is where you can now assign your audience for each of your files.

4. Now back on your page where your HCWP is displayed, edit your webpart and toggle on the “Audience Targeting”.

5. Save and publish and now your audience will only see content relevant to them!
Quick links web part - We can make specific links available to a select group of users by setting audience targeting on your Quick Links web part.
1. Click the pencil/edit icon next to your Quick Links Web part and toggle “Enable Audience Targeting” to “On”

2. Next, when editing a given link, scroll to the bottom of the edit panel and specify the security groups that will see the link. (If you leave it blank it will be visible to everyone).

Events web part – Just as with the News Web Part, you can spotlight specific events to relevant audiences.
1. First, navigate to your events list and go to List settings
2. Click on “Audience Targeting settings” and click the checkbox to enable Audience Targeting
3. Next, navigate to your page where the Events web part resides and go into edit mode
4. Click the edit/pencil icon on your news webpart
5. In the edit menu, toggle “Audience Targeting” to “On”

6. Hit apply and then re-publish your page
7. Now, navigate to any of your events, edit the event and scroll down until you see a box called “Audience”. Enter the groups you want to target your event to. (Note if you leave it blank, everyone will be able to see the event).

8. Click save on your event and now only the specified audiences will be able to see the event on your Event Web Part.
And there you have – many different ways to audience target your content in SharePoint online!